conda 环境配置
1 | conda create -n transformer python=3.8 |
下载模型
1 | git clone https://github.com/meta-llama/llama3.git |
示例代码
基于pipeline 调用
使用pipeline的方式,可以很好的帮助我们快速实现模型的调用。尤其是其中 prompt 的构建。
1 | import transformers |
直接调用
1 | from transformers import AutoTokenizer, AutoModelForCausalLM |
更多调用示例,参考开箱即用的-pipelines
背后原理
这些简单易用的 pipeline 模型实际上封装了许多操作,下面我们就来了解一下它们背后究竟做了啥。以情感分析 pipeline 为例,我们运行下面的代码1
2
3
4
5from transformers import pipeline
classifier = pipeline("sentiment-analysis")
result = classifier("I've been waiting for a HuggingFace course my whole life.")
print(result)
就会得到结果:1
[{'label': 'POSITIVE', 'score': 0.9598048329353333}]
实际上它的背后经过了三个步骤:
- 预处理 (preprocessing),将原始文本转换为模型可以接受的输入格式;
- 将处理好的输入送入模型;
- 对模型的输出进行后处理 (postprocessing),将其转换为人类方便阅读的格式。

使用分词器进行预处理
因为神经网络模型无法直接处理文本,因此首先需要通过预处理环节将文本转换为模型可以理解的数字。具体地,我们会使用每个模型对应的分词器 (tokenizer) 来进行:
- 将输入切分为词语、子词或者符号(例如标点符号),统称为 tokens;
- 根据模型的词表将每个 token 映射到对应的 token 编号(就是一个数字);
- 根据模型的需要,添加一些额外的输入。
我们对输入文本的预处理需要与模型自身预训练时的操作完全一致,只有这样模型才可以正常地工作。注意,每个模型都有特定的预处理操作,如果对要使用的模型不熟悉,可以通过 Model Hub 查询。这里我们使用 AutoTokenizer 类和它的 from_pretrained() 函数,它可以自动根据模型 checkpoint 名称来获取对应的分词器。
情感分析 pipeline 的默认 checkpoint 是 distilbert-base-uncased-finetuned-sst-2-english,下面我们手工下载并调用其分词器:1
2
3
4
5
6
7
8
9
10
11from transformers import AutoTokenizer
checkpoint = "distilbert-base-uncased-finetuned-sst-2-english"
tokenizer = AutoTokenizer.from_pretrained(checkpoint)
raw_inputs = [
"I've been waiting for a HuggingFace course my whole life.",
"I hate this so much!",
]
inputs = tokenizer(raw_inputs, padding=True, truncation=True, return_tensors="pt")
print(inputs)
1 | { |
可以看到,输出中包含两个键 input_ids 和 attention_mask,其中 input_ids 对应分词之后的 tokens 映射到的数字编号列表,而 attention_mask 则是用来标记哪些 tokens 是被填充的(这里“1”表示是原文,“0”表示是填充字符)。
先不要关注
padding、truncation这些参数,以及 attention_mask 项,后面我们会详细介绍:)。
将预处理好的输入送入模型
预训练模型的下载方式和分词器 tokenizer 类似,Transformers 包提供了一个 AutoModel 类和对应的 from_pretrained() 函数。下面我们手工下载这个 distilbert-base 模型:1
2
3
4from transformers import AutoModel
checkpoint = "distilbert-base-uncased-finetuned-sst-2-english"
model = AutoModel.from_pretrained(checkpoint)
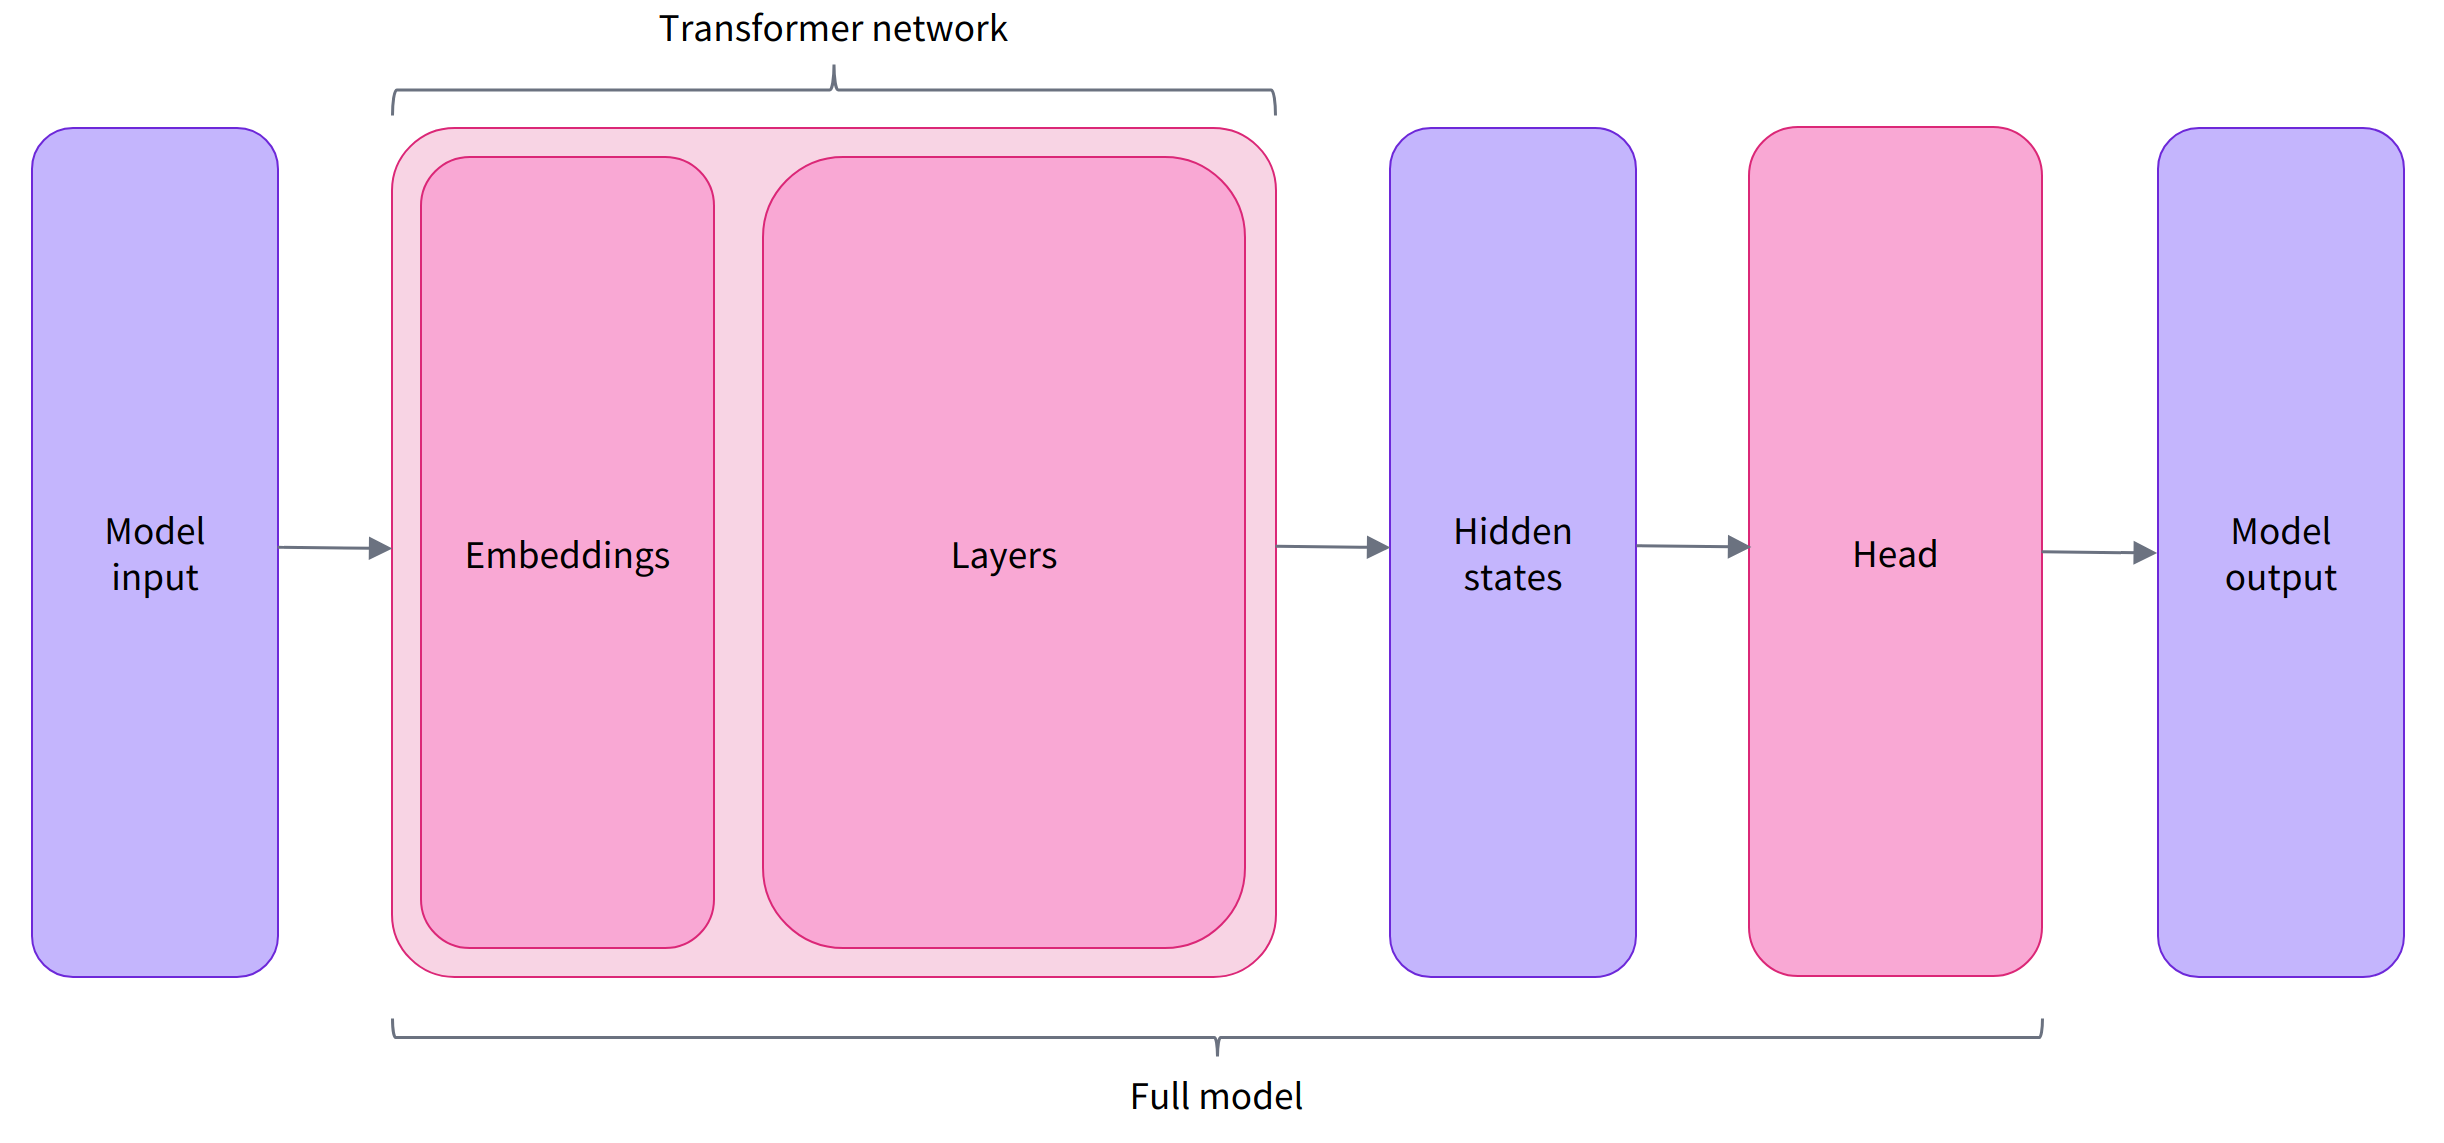
预训练模型的本体只包含基础的 Transformer 模块,对于给定的输入,它会输出一些神经元的值,称为 hidden states 或者特征 (features)。对于 NLP 模型来说,可以理解为是文本的高维语义表示。这些 hidden states 通常会被输入到其他的模型部分(称为 head),以完成特定的任务,例如送入到分类头中完成文本分类任务。
其实前面我们举例的所有 pipelines 都具有类似的模型结构,只是模型的最后一部分会使用不同的 head 以完成对应的任务。
transformer_and_head
Transformers 库封装了很多不同的结构,常见的有:
Model (返回 hidden states) ForCausalLM (用于条件语言模型)
ForMaskedLM (用于遮盖语言模型) ForMultipleChoice (用于多选任务)
ForQuestionAnswering (用于自动问答任务) ForSequenceClassification (用于文本分类任务)
*ForTokenClassification (用于 token 分类任务,例如 NER)
Transformer 模块的输出是一个维度为 (Batch size, Sequence length, Hidden size) 的三维张量,其中 Batch size 表示每次输入的样本(文本序列)数量,即每次输入多少个句子,上例中为 2;Sequence length 表示文本序列的长度,即每个句子被分为多少个 token,上例中为 16;Hidden size 表示每一个 token 经过模型编码后的输出向量(语义表示)的维度。
预训练模型编码后的输出向量的维度通常都很大,例如 Bert 模型 base 版本的输出为 768 维,一些大模型的输出维度为 3072 甚至更高。
我们可以打印出这里使用的 distilbert-base 模型的输出维度:1
2
3
4
5
6
7
8
9
10
11
12
13
14
15from transformers import AutoTokenizer, AutoModel
checkpoint = "distilbert-base-uncased-finetuned-sst-2-english"
tokenizer = AutoTokenizer.from_pretrained(checkpoint)
model = AutoModel.from_pretrained(checkpoint)
raw_inputs = [
"I've been waiting for a HuggingFace course my whole life.",
"I hate this so much!",
]
inputs = tokenizer(raw_inputs, padding=True, truncation=True, return_tensors="pt")
outputs = model(**inputs)
print(outputs.last_hidden_state.shape)
torch.Size([2, 16, 768])
Transformers 模型的输出格式类似 namedtuple 或字典,可以像上面那样通过属性访问,也可以通过键(outputs[“last_hidden_state”]),甚至索引访问(outputs[0])。
对于情感分析任务,很明显我们最后需要使用的是一个文本分类 head。因此,实际上我们不会使用 AutoModel 类,而是使用 AutoModelForSequenceClassification:1
2
3
4
5
6
7
8
9
10
11
12
13
14
15
16from transformers import AutoTokenizer
from transformers import AutoModelForSequenceClassification
checkpoint = "distilbert-base-uncased-finetuned-sst-2-english"
tokenizer = AutoTokenizer.from_pretrained(checkpoint)
model = AutoModelForSequenceClassification.from_pretrained(checkpoint)
raw_inputs = [
"I've been waiting for a HuggingFace course my whole life.",
"I hate this so much!",
]
inputs = tokenizer(raw_inputs, padding=True, truncation=True, return_tensors="pt")
outputs = model(**inputs)
print(outputs.logits.shape)
torch.Size([2, 2])
可以看到,对于 batch 中的每一个样本,模型都会输出一个两维的向量(每一维对应一个标签,positive 或 negative)。
对模型输出进行后处理
由于模型的输出只是一些数值,因此并不适合人类阅读。例如我们打印出上面例子的输出:1
2
3
4
5
6
7
8
9
10
11
12
13
14
15
16
17from transformers import AutoTokenizer
from transformers import AutoModelForSequenceClassification
checkpoint = "distilbert-base-uncased-finetuned-sst-2-english"
tokenizer = AutoTokenizer.from_pretrained(checkpoint)
model = AutoModelForSequenceClassification.from_pretrained(checkpoint)
raw_inputs = [
"I've been waiting for a HuggingFace course my whole life.",
"I hate this so much!",
]
inputs = tokenizer(raw_inputs, padding=True, truncation=True, return_tensors="pt")
outputs = model(**inputs)
print(outputs.logits)
tensor([[-1.5607, 1.6123],
[ 4.1692, -3.3464]], grad_fn=<AddmmBackward0>)
模型对第一个句子输出 $[-1.5607, 1.6123]$,对第二个句子输出 $[ 4.1692, -3.3464]$,它们并不是概率值,而是模型最后一层输出的 logits 值。要将他们转换为概率值,还需要让它们经过一个 SoftMax 层,例如:1
2
3import torch
predictions = torch.nn.functional.softmax(outputs.logits, dim=-1)
print(predictions)
1 | tensor([[4.0195e-02, 9.5980e-01], |
所有 Transformers 模型都会输出 logits 值,因为训练时的损失函数通常会自动结合激活函数(例如 SoftMax)与实际的损失函数(例如交叉熵 cross entropy)。
这样模型的预测结果就是容易理解的概率值:第一个句子 $[0.0402, 0.9598]$,第二个句子 $[0.9995, 0.0005]$。最后,为了得到对应的标签,可以读取模型 config 中提供的 id2label 属性:1
2
3print(model.config.id2label)
{0: 'NEGATIVE', 1: 'POSITIVE'}
于是我们可以得到最终的预测结果:
- 第一个句子: NEGATIVE: 0.0402, POSITIVE: 0.9598
- 第二个句子: NEGATIVE: 0.9995, POSITIVE: 0.0005